PARQUET – The Elegant Flooring
Installing parquet flooring is less difficult to install than other types of flooring. Parquet is real wood that has been cut into squares and with tongue and groove connections to each other. It’s also available with square edges. The least expensive uses 6 inch pieces of wood set into a 12” x 12” pattern. It is pre-finished with a durable poly-urathane coat. It also is available with glue on the underside and in a variety of stain colors. It can be installed directly to concrete that has been sealed; over existing linoleum or vinyl tile flooring and over existing wood floors.
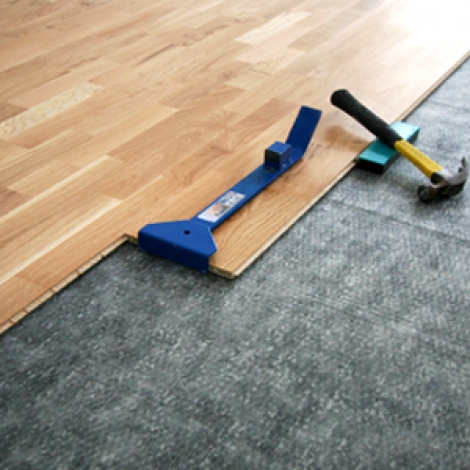
A table saw speeds up the work but it can be installed using just your household tools and a saw. A rubber mallet is helpful but a hammer and scrap of wood works too. The only special tool you need is a $10 undercut saw.
Prices begin as low as $1 per sq.
ft. Prepare the room first. It’s best if you can remove all the furniture. Next remove all the baseboard and shoe molding as carefully as possible and remove the nails. Mark the back to identify which wall it was removed from and set it aside. Follow the manufacturers instructions to seal concrete and let it dry thoroughly.
Do not start in the middle of the room. Start in the simple corner with no closets or doors to cut around. With the self-adhesive type, peal off the paper backing and lay the piece in the corner but hold it away from the wall about ” to allow for expansion and movement.
Use a rubber mallet to tap the pieces together. The adhesive will take effect after you finish. Keep laying the pieces until you are ready to cut the pieces that will go against the walls.
For cutting, turn the piece over so the paper side is up. Lay it face to face with the installed piece and slide it toward the wall to within the ” space that should be left open. Mark the piece on the edge using the installed piece as the guide point. Cut the piece, remove the paper and slip it into the tongue or groove. Don’t throw away the cut piece – it may be usable on the other wall or, if the cut you made is less than half the piece, the remainder can be used on the same wall.
Be sure the piece you are going to cut has either a tongue to match the groove on the piece already installed (or a groove if a tongue is exposed).
When you go into a closet or through a door, use the undercut saw to cut the jamb and trim to allow the piece to go under them. If the door is going into another room and the flooring changes, cut the pieces to center under the door. A matching piece of threshold is available which you can cut to size and tack nail to the new flooring with small brad nails or glue to the floor.
Stomp up and down on each piece. Re-install the baseboard and shoe molding, countersink the nails, putty the nail holes and paint or stain the wood.